Forms are used in web development for user interactions. Details of an individual are obtained by using forms. We use a form tag to create forms in HTML. We can use different input fields to interact with users. These input fields are placed inside an HTML form tag. The input element can be displayed in several ways. It depends upon the type attribute. It can be a text field, checkbox, text area, and many more. The form tag has few attributes itself. The action attribute is used to specify the location where the form-data will be submitted. The method attribute is used to specify how to send the form-data.
Topics in this article
- HTML form templates
- Form radio
- Validating a form
- Form input types
- Form action
- PHP example to read the submitted form
- Conclusion
HTML form templates
Following is an example of an HTML form that could be used for registration.
<html>
<body>
<h2>Register</h2>
<form action="/register.php">
  First name:<br>
  <input type="text" name="firstname" required>
  <br>
  Last name:<br>
  <input type="text" name="lastname" required>
  <br>
  Email:<br>
  <input type="email" name="email" required>
  <br>
  Password:<br>
  <input type="password" name="password" required>
  <br>
  Confirm password:<br>
  <input type="password" name="password" required>
  <br>
  Gender:<br>
  <input type="radio" name="gender"> Male <input type="radio" name="gender"> Female <input type="radio" name="gender"> Other
  <br>
  <input type="submit" value="Submit">
</form>
</body>
</html>
The output is:

In the above form, I have used different types of input fields. We will discuss these different types of input fields later in this article. I also used the required attribute in many input tags above. We use it for validation. We will also discuss this later in the article.
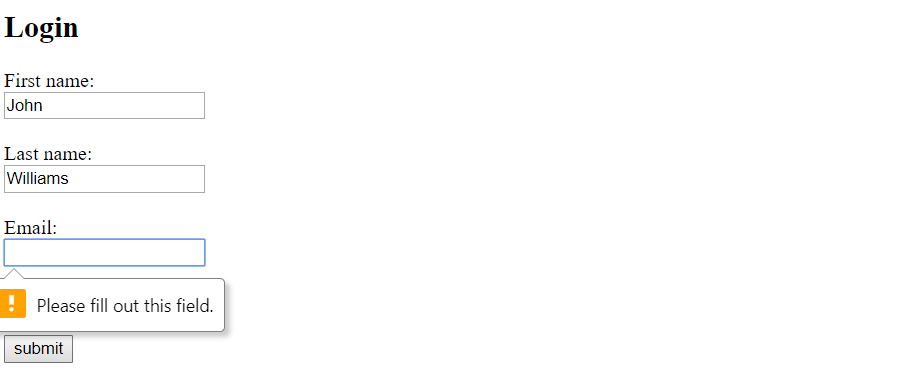
The following code shows a HTML form of a login page.
<html>
<body>
<h2>Login</h2>
<form action="/login.php">
  Email: <br>
  <input type="text" required>
  <br> <br>
  Password: <br>
  <input type="password" required>
  <br> <br>
  <input type="submit" value="submit">
</form>
</body>
</html>

Form radio
There are various input types that we can use to create HTML forms. One of them is the radio. Radio is one of the most commonly used input type. Have you ever noticed a few circular options while registering or signing up online? For example, while choosing your gender. That is known as the radio. Following is an example of radio types.
<html>
<body>
<form action="">
   Gender: <br>
  <input type="radio" value="male"> Male <input type="radio" value="female"> Female <input type="radio" value="other"> Other
  <br> <br>
  <input type="submit" value="submit">
  </form>
</body>
</html>

In the above example, there are three radio buttons. You can only select one of them. The value attribute specifies the value of each radio button. We can also use a checked attribute to select a radio button initially. The following example has a checked attribute.
<html>
<body>
<form action="">
   Gender: <br>
  <input type="radio" value="male" checked> Male <input type="radio" value="female"> Female
<input type="radio" value="other"> Other
  <br> <br>
  <input type="submit" value="submit">
</form>
</body>
</html>

In the above example, the male radio button is given a checked attribute.
Validations
Validation plays an important part in the HTML forms. In a form, few input fields are always mandatory. For example, while signing up at facebook, fields like the first name, last name, email, and password are mandatory to fill. For this validation, We use the required attribute.
<html>
<body>
<h2>Login</h2>
<form action="">
   First name: <br>
   <input type="text">
   <br><br>
   Last name: <br>
   <input type="text">
   <br><br>
   Email: <br>
   <input type="email" required>
   <br><br>
  <br> <br>
  <input type="submit" value="submit">
</form>
</body>
</html>
When we try to submit the HTML form without filling the email field, a message will appear because we have marked the email field as required.
We can also use the maxlength attribute in the input field when the type is text. The maxlength attribute specifies the maximum length allowed for the input field. The following code has two input fields with type text. Both have a maximum length of ten. This means we cannot type more than ten characters in those input fields.
<html>
<body>
<form action="">
First name:<br>
<input type="text" maxlength="10">
<br>
Last name:<br>
<input type="text" maxlength="10">
</form>
</body>
</html>
We have to use Javascript for heavy form validations.
Form input types
We can use various input types while creating a form. A form can consist of a number of input fields with different types. I will explain some of the most basic and commonly used input types.
Text:
The most commonly used input type is text. We can use the text type when data needed to be entered in the input field is text. It is used for the input fields like the first name, middle name, last name, address, etc. The value attribute can be used to give the field an initial value. The following code has two input fields with initial values.
<html>
<body>
<form action="">
First name: <br>
<input type="text" value="John">
<br><br>
Last name: <br>
<input type="text" value="Williams">
<br><br>
</form>
</body>
</html>

Email:
Email input fields are widely present all over the internet. Every website asks for an email when we try to register. For email, input has a separate type. When an input field has email as its type, You have to enter a valid email address or otherwise it will show a message. In the following example, the email field has the type of email. If we try to submit without providing a valid email address, it will show an error message.
<html>
<body>
<form action="" >
First name: <br>
<input type="text" value="John">
<br><br>
Last name: <br>
<input type="text" value="Williams"> <br><br>
Email: <br>
<input type="email">
<br><br>
<input type="submit">
</form> </body> </html>
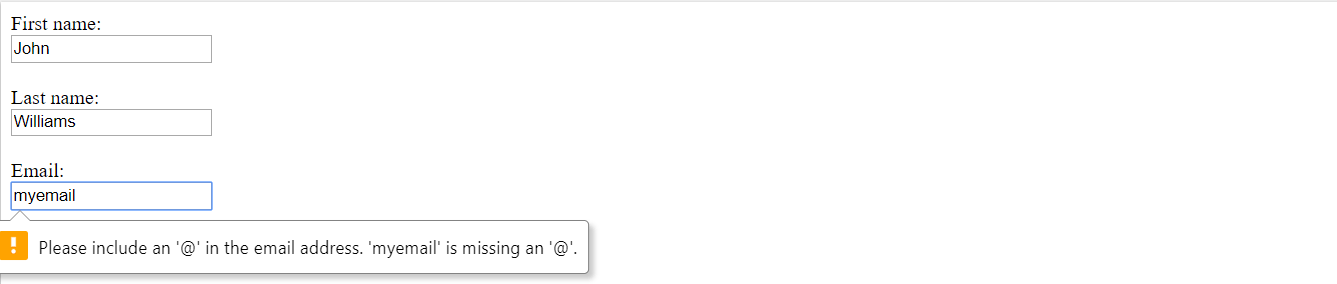
It will only accept a valid email.
Password:
Passwords are sensitive. We do not want to share our passwords with anyone. They should be discrete even while typing them on screen. We use the password type in input fields for a password. We can type the password in the field but it will not appear, instead, the dots will appear. The following input field has a password type.
<html>
<body>
<h2>Login</h2>
<form action="/login.php">
Email: <br>
<input type="text" required>
<br> <br>
Password: <br>
<input type="password" required>
<br> <br>
<input type="submit" value="submit">
</form>
</body>
</html>

Checkbox:
We used radio type for selecting a single option from the various option. What if we want to select a multiple of them? We use checkbox as the type for this. Like radio, We can also check the checkbox initially, even more than one. The following example has four checkboxes and two of them are already checked.
<html>
<body>
<form action="">
<input type="checkbox" value="BMW" checked>BMW
<br>
<input type="checkbox" value="Audi" checked>Audi
<br>
<input type="checkbox" value="Ferrari" >Ferrari
<br>
<input type="checkbox" value="Mercedes" >Mercedes
<br><br>
<input type="submit" value="submit">
</form>

</body>
</html>

Similar to the radio type, We also need to give a value to every checkbox.
Submit:
A form is incomplete without buttons. There are three types of buttons available in input tags. The most important of them is Submit. We can use the submit type to create a button, which when clicked, submit the form-data to the URL specified in the action attribute of the form tag. The value given to this input is the text that appears on the button.
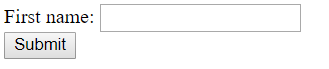
<html>
<body>
<form action="/url.php">
First name: <input type="text" value="Mickey"><br>
Last name: <input type="text" value="Mouse"><br><br>
<input type="submit" value="submit">
</form>
</body>
</html>
Apart from the submit, We can also use the button and reset as the type. The button type creates a clickable button and the reset type initializes the values of all input fields to the initial values.
Hidden
The input type is different than any other input type. When we use the hidden type in an input field, that input field does not appear on the screen. Then what is the use of it? It is used by web developers for updating the database when the form is submitted. The user is unaware of this input field. The following form has two input fields. The first one is of text type while the second one is of hidden.
This type of input is similar to an HTML comment. But, in a hidden field, the value of such a field is passed within the form.
<html>
<body
<form action="">
  First name: <input type="text" name="fname"><br>
  <input type="hidden" id="custId" name="custId" value="1234">
  <input type="submit" value="Submit">
</form>
</body>
</html>
We cannot see the second input field.
The output is:
TextArea
The text area is not basically an input type but it is a tag itself. It is also used frequently in HTML forms. We can use the textarea tag to provide a place in the form for the user to write something. We define a text area by the number of rows and columns. It can contain unlimited characters. The following example shows a text area with four rows and fifty columns.
<html>
<body>
<form>
  <textarea rows="4" cols="50">
  </textarea>
<input type="submit">
</form>
</body>
</html>
The output is:

We can also initialize a text area by writing anything inside the textarea tags.
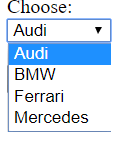
Select
Similar to the textarea tag, Select is not an input type. It is a tag that is also frequently used in HTML forms. Select tag is nothing but a dropdown with various options to select. We can choose only one option. The select tag is used to create a dropdown and an option tag to create an option inside it. We can use any number of option tags inside the select tag. The following code has a select tag with four options.
<html>
<body>
<form action="">
  Choose: <br>
  <select>
    <option value="Audi">Audi </option>
    <option value="BMW">BMW </option>
    <option value="Ferrari">Ferrari </option>
    <option value="Mercedes">Mercedes </option>
  </select>
  <br><br>
  <input type="submit">
</form>
</body>
</html>
The output is:
We should insert a value attribute inside every option tag because it helps behind the scene when we use Javascript.
Form action
The form tag has an action attribute. This attribute specifies the URL or the file where the form-data is to be submitted when the submit is clicked. Apart from the action attribute, there is one more attribute called method. The method attribute can have GET or POST as its value. It specifies how to send the form-data.
When we use the GET method, form-data is sent as a URL variable. The following HTML file has a login form.
<html>
<body>
<form action="action_get.php" method="get">
Name: <br>
<input type="text" name="name"><br><br>
E-mail: <br><input type="text" name="email"><br><br>
<input type="submit">
</form>
</body>
</html>
The output is:
The action attribute has a PHP file, action_get. When the submit button is clicked, form-data is submitted to action_get.php file.
<html>
<body>
Welcome <?php echo $_GET["name"]; ?><br>
Your email address is: <?php echo $_GET["email"]; ?>
</body>
</html>
The output is:

When the GET method is used, form-data is sent through the URL in the address bar. Observe the picture below. We can see the form-data submitted earlier.
The output is:

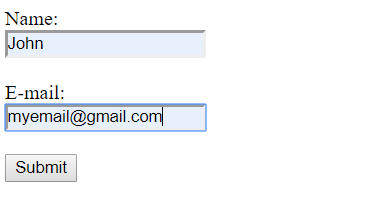
The post method does not send data through the URL. Instead, the form-data is embedded inside the HTTP request. The action attribute of the following form has a PHP file, action_post.
<html>
<body>
<form action="action_post.php" method="get">
Name: <br>
<input type="text" name="name"><br><br>
E-mail: <br><input type="text" name="email"><br><br>
<input type="submit">
</form>
</body>
</html>
The output is:
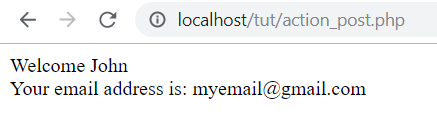
The following file is action_post.php
<html>
<body>
Welcome <?php echo $_POST["name"]; ?><br>
Your email address is: <?php echo $_POST["email"]; ?>
</body>
</html>
The output is:

Observe the address bar after submitting the form. We can see there are no values in the URL.
PHP example to read the submitted form
In the above topic, We observe the difference between GET and POST. While there was a difference in the address bar, but the output was the same. In the action_get.php file, I use the following code to print form-data.
Welcome <?php echo $_GET["name"]; ?><br>
Your email address is: <?php echo $_GET["email"]; ?>
In the action_post.php file, I used the following code.
Welcome <?php echo $_POST["name"]; ?><br>
Your email address is: <?php echo $_POST["email"]; ?>
We can see, I separately printed the name and email in both the files. This is fine when there are just two input fields, but what to do when there are multiple input fields in the HTML form? Printing data of every input field will result in a code consisting of too many lines. Moreover, it will be difficult for others to analyze the code. To solve this problem, we can use the Foreach loop provided by PHP. We can use the foreach loop to iterate through input fields. The following example has a registration HTML form with various input fields.
<html>
<body>
<form action="action_post.php" method="post">
First name: <br>
<input type="text" name="firstname"><br><br>
Middle name: <br>
<input type="text" name="middlename"><br><br>
Last name: <br>
<input type="text" name="lastname"><br><br>
E-mail: <br><input type="text" name="email"><br><br>
Gender: <br>
<input type="radio" name="gender" value="male"> Male <input type="radio" name="gender" value="female"> Female
<input type="radio" name="gender" value="other"> Other<br><br>
<input type="submit">
</form>
</body>
</html>
The output is:

The action_post.php is as follows,
<html>
<body>
<?php Foreach ($_POST as $key => $value) {
echo "$key is $value<br>";
}
?>
</body>
</html>
The output is:
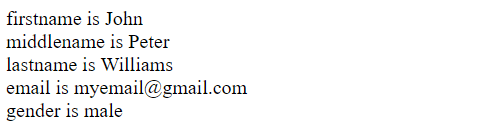
Observe the above code. In the Foreach loop, $_POST is used because I specified the method of the form as POST. If we want to use GET method, then write $_GET instead of $_POST. The $key represents the name of every field and the $value represents the value of every field. echo is used to print data on the screen.
Conclusion
HTML forms are one of the best methods for user interaction. We can use these forms for submitting data or retrieving the data. There are a variety of input types that we can use to create a form. I already explained a few common and important types earlier.
You can also configure font colors or background colors in the form fields. Images can be used as buttons as well.
We can also use Javascript to process forms before posting them, behind the scenes. For example, we can concatenate a string or parse numbers before posting the form.
HTML forms play an important part in full-stack web development and one should master them before going to the upper level.
