For years, MySQL is the favorite database system for developers worldwide. After the acquisition of MySQL by Sun Microsystems, and later by Oracle, the original founders of MySQL forked MySQL and created another RDBMS called MariaDB. It is actually a perfect replacement for MySQL and has more features and better performance than MySQL. MariaDB is gaining a lot of popularity these days, and many big companies have already migrated to MariaDB from MySQL. In this post, we will discuss how to install MariaDB in a Centos 6 cheap vps hosting server, how to configure and manage the database etc.
Let’s begin to Install MariaDB
In any Red Hat based systems, the installation of any software is very simple. Red Hat uses the package manager called yum. Centos, being inherited from RedHat, has many built in repos through which yum installs and updates the packages. In addition, it also allows adding third party repos to install specific software. MariaDB thus comes with its own repo for its installation.First, create the file /etc/yum.repos.d/MariaDB.repo.
[root@teste6 ~]# cd /etc/yum.repos.d/
[root@teste6 yum.repos.d]# touch MariaDB.repo
[root@teste6 yum.repos.d]# vi MariaDB.repo
Now copy and paste the following lines into the file /etc/yum.repos.d/MariaDB.repo. The contents vary based on the OS version and its architecture. Hence, make sure you copy the correct repo.
On a Centos 6 – 64 bit system
# MariaDB 5.5 CentOS repository list - created 2013-08-11 14:22 UTC
# http://mariadb.org/mariadb/repositories/
[mariadb]
name = MariaDB
baseurl = http://yum.mariadb.org/5.5/centos6-amd64
gpgkey=https://yum.mariadb.org/RPM-GPG-KEY-MariaDB
gpgcheck=1
On a Centos 6 – 32 bit system
# MariaDB 5.5 CentOS repository list - created 2013-08-11 14:21 UTC
# http://mariadb.org/mariadb/repositories/
[mariadb]
name = MariaDB
baseurl = http://yum.mariadb.org/5.5/centos6-x86
gpgkey=https://yum.mariadb.org/RPM-GPG-KEY-MariaDB
gpgcheck=1
Save and quit the file. Now it’s time to start with the installation.
[root@teste6 yum.repos.d]# yum -y install MariaDB MariaDB-server
The above step will install MariaDB in the server. Let’s now start MariaDB and see if all is good. Do not get confused seeing the startup script name as mysql and not mariadb.
[root@teste6 yum.repos.d]# /etc/rc.d/init.d/mysql start
Starting MySQL... SUCCESS!
Post Installation Security Steps
Now that MariaDB started fine without errors, let’s proceed with further steps. By default, the root password for MariaDB is blank which is a big security risk. In addition, there are a few more security practices you must perform after the installation. The built in script ‘/usr/bin/mysql_secure_installation’ takes care of all those security holes, which includes the following:
- Reset MariaDB root password
- Remove anonymous users
- Disallow MariaDB root login from network
- MariaDB has a default test database with public access, the script removes the database and access to it
- Finally reload the privilege tables to apply the changes.
So now, let’s run the script mysql_secure_installation and answer with ‘yes’ for the questions asked and also set a strong root password when asked.
[root@teste6 ~]# mysql_secure_installation
/usr/bin/mysql_secure_installation: line 379: find_mysql_client: command not found

NOTE: RUNNING ALL PARTS OF THIS SCRIPT IS RECOMMENDED FOR ALL MariaDB
      SERVERS IN PRODUCTION USE!  PLEASE READ EACH STEP CAREFULLY!

In order to log into MariaDB to secure it, we'll need the current
password for the root user.  If you've just installed MariaDB, and
you haven't set the root password yet, the password will be blank,
so you should just press enter here.

Enter current password for root (enter for none):
OK, successfully used password, moving on...

Setting the root password ensures that nobody can log into the MariaDB
root user without the proper authorisation.

Set root password? [Y/n] y
New password:
Re-enter new password:
Password updated successfully!
Reloading privilege tables..
 ... Success!


By default, a MariaDB installation has an anonymous user, allowing anyone
to log into MariaDB without having to have a user account created for
them.  This is intended only for testing, and to make the installation
go a bit smoother.  You should remove them before moving into a
production environment.

Remove anonymous users? [Y/n] y
 ... Success!

Normally, root should only be allowed to connect from 'localhost'.  This
ensures that someone cannot guess at the root password from the network.

Disallow root login remotely? [Y/n] y
 ... Success!

By default, MariaDB comes with a database named 'test' that anyone can
access.  This is also intended only for testing, and should be removed
before moving into a production environment.

Remove test database and access to it? [Y/n] y
 - Dropping test database...
 ... Success!
 - Removing privileges on test database...
 ... Success!

Reloading the privilege tables will ensure that all changes made so far
will take effect immediately.

Reload privilege tables now? [Y/n] y
 ... Success!

Cleaning up...

All done!  If you've completed all of the above steps, your MariaDB
installation should now be secure.

Thanks for using MariaDB!
Once you completed the steps to install MariaDB, you need to restart MariaDB. This ensure changes get into effect. You also need to add MariaDB to the startup. This way the service will be automatically started when the server reboots.
[root@teste6 ~]# /etc/rc.d/init.d/mysql restart
Shutting down MySQL. SUCCESS!
Starting MySQL.. SUCCESS!


[root@teste6 ~]# chkconfig mysql on
Logging in to MariaDB
MariaDB is almost similar to MySql in its execution. The commands and syntax are mostly the same, hence whoever worked in MySql will not have any difficulty switching to MariaDB. Let’s see how to connect to the MariaDB prompt as user root.
[root@teste6 ~]# mysql -u root -p
Enter password:
Welcome to the MariaDB monitor.  Commands end with ; or \g.
Your MariaDB connection id is 3
Server version: 5.5.49-MariaDB MariaDB Server

Copyright (c) 2000, 2016, Oracle, MariaDB Corporation Ab and others.

Type 'help;' or '\h' for help. Type '\c' to clear the current input statement.

MariaDB [(none)]>
The basic commands used in MariaDB are same as that of MySql. I am listing a few below for your easiness. Make sure you end your queries with a semicolon at the end, or the query will not execute and MariaDB will return an error.
- create database – To create a new database
- show databases – List all databases created
- use database – To switch to that database
- create table – To create a table within the database to which it is switched
- insert into – To insert values into a table
- update – To modify the values in a table
- select – To retrieve data from a table
- drop database – To remove a database
In the example given below, I am going to create a database named ‘school’. The database will have a single table named ‘student’ with fields – ‘id’ which is integer, ‘name’ which is varchar, ‘age’ which is again integer etc. MariaDB supports a lot of data types which are documented in their knowledge base. I will enter the values to the table, modify the name of one student from the table, view the details from the table and then drop the database.
[root@teste6 ~]# mysql -u root -p
Enter password:
Welcome to the MariaDB monitor.  Commands end with ; or \g.
Your MariaDB connection id is 8
Server version: 5.5.49-MariaDB MariaDB Server

Copyright (c) 2000, 2016, Oracle, MariaDB Corporation Ab and others.

Type 'help;' or '\h' for help. Type '\c' to clear the current input statement.

MariaDB [(none)]> create database school;
Query OK, 1 row affected (0.00 sec)

MariaDB [(none)]> show databases;
+--------------------+
| Database           |
+--------------------+
| information_schema |
| mysql              |
| performance_schema |
| school             |
+--------------------+
4 rows in set (0.00 sec)

MariaDB [(none)]> use school;
Database changed
MariaDB [school]> create table student(id int primary key, name varchar(20), age int);
Query OK, 0 rows affected (0.01 sec)

MariaDB [school]> show tables;
+------------------+
| Tables_in_school |
+------------------+
| student          |
+------------------+
1 row in set (0.00 sec)

MariaDB [school]> insert into student values(1, 'prad', 30);
Query OK, 1 row affected (0.00 sec)

MariaDB [school]> update student set name='Brad' where id=1;
Query OK, 1 row affected (0.00 sec)
Rows matched: 1  Changed: 1  Warnings: 0

MariaDB [school]> select * from student;
+----+------+------+
| id | name | age  |
+----+------+------+
|  1 | Brad |   30 |
+----+------+------+
1 row in set (0.00 sec)

MariaDB [school]> drop database school;
Query OK, 1 row affected (0.00 sec)

MariaDB [(none)]> show databases;
+--------------------+
| Database           |
+--------------------+
| information_schema |
| mysql              |
| performance_schema |
+--------------------+
3 rows in set (0.00 sec)

MariaDB [(none)]> \q
Bye
Connecting to a database
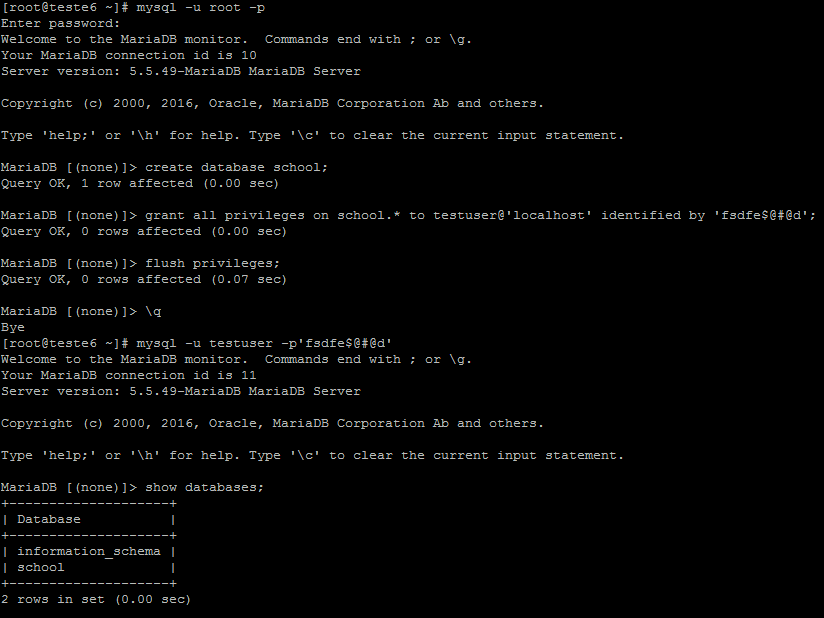
After install MariaDB, to connect to a database, you require a username and password. You can always connect as the root user, but using it always is not a good idea and is a security risk, hence you should create specific users with strong passwords for individual databases. You can create a user, assign required privileges to the database, set password etc all using a single ‘grant’ command as root user. The following image shows how a user named ‘testuser’ with password ‘fsdfe$@#@d’ has been created and all privileges have been assigned towards the database ‘school’.
For any changes to be made in the database, we can login as the user ‘testuser’. This gives more security as anyone who works on a database has their access limited to that single database, and do not even see the other databases created in the server.
Apart from command line, you can also connect to a MariaDB database using tools like Database Workbench, or using web interface like PhpMyAdmin. You can also connect from your PHP code using mysql_connect tag as follows.
mysql_connect('HOST', 'USERNAME', 'PASSWORD');You need to replace HOST with your actual hostname or IP Address, USERNAME with your database username and PASSWORD with your database user’s password.
On coming to the end of this post, we sincerely hope this post helped you to Install MariaDB in Centos 6.
