DNS propagation is the process by which DNS changes — such as pointing a domain to a new server — spread across all DNS servers on the internet. When you update your nameservers or any DNS record, the change does not take effect instantly worldwide. Depending on your TTL settings and your ISP’s caching behavior, it can take anywhere from a few minutes to 48 hours for everyone to see the updated version.
In this guide, you will learn exactly how DNS propagation works, why it takes time, how to speed it up, and how to check whether your changes have already propagated in different parts of the world.
Table of Contents
DNS Propagation basics
When you change the nameservers of a domain, it can take 24 to 48 hours for the update to fully take effect.
This delay happens because internet providers around the world need time to refresh their systems. They’ll check and update the new DNS information for your domain. If it takes longer, we recommend this article about how to fix slow DNS lookups.
This process is called DNS propagation – it’s the time needed for all DNS servers across the internet to recognize the new location of your website.
Usually, it takes 1 to 2 days, but in some cases, it might be quicker or take a bit longer.

DNS Propagation time
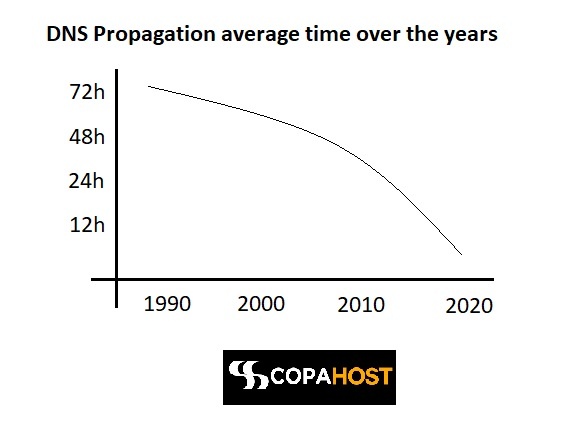
The providers must update their DNS caches from time to time. They have to keep caches, in order not to overload the internet.
The internet providers’ connection speeds have grown substantially over the last years. It reduced DNS caching times over the years.
In the middle ’90s, a domain name consumed up to 3 days to update the DNS changes. Nowadays, such updated occur in a few hours only. The time to live (TTL) is diminishing annually. The following graphic explains the DNS propagation time, on average:
Is it possible to speed up DNS propagation?
DNS propagation is largely automatic — each DNS server caches records according to its own TTL settings.
Whenever the caching time expires, it will query again the domain registrar to check for any updates in DNS. However, we can force our PC to look up again for the updated DNS. While there is no way to force global DNS propagation, you can update your own device immediately by flushing its local DNS cache.
In Windows command prompt, this will flush your DNS cache:
ipconfig /flushdnsOr even, we can simply change our local DNS servers. Switching to a public DNS server gives your device a fresh resolver that is more likely to return the updated record immediately.
We can recommend these free DNS resolvers:
- Google DNS: 8.8.8.8 and 8.8.4.4
- OpenDNS: 208.67.220.220 and 208.67.222.222
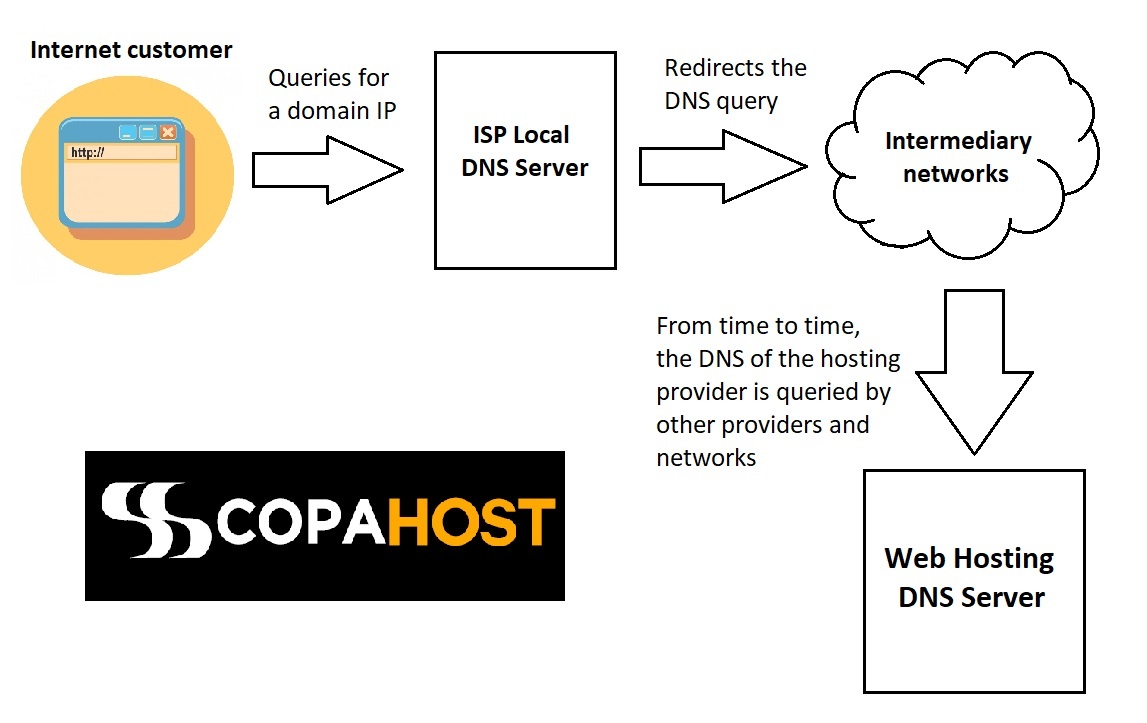
How does a DNS query work?
Simple explanation
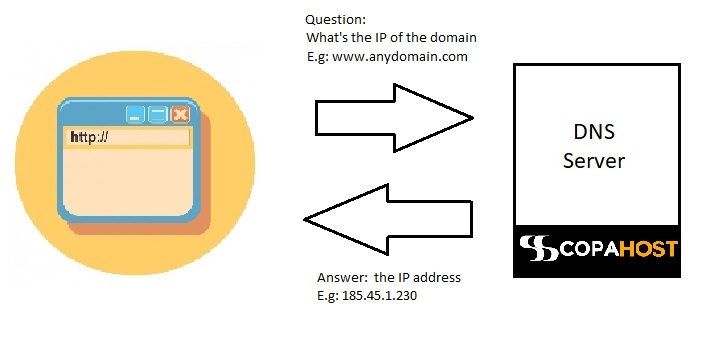
Every network device on the web makes use of an IP address to route requests. This is similar to someone asking the DNS server what is the IP address of a certain domain.
Then, the DNS server answers this question, with the corresponding IP address. Whenever you type a URL and hit enter, your browser makes a request for a particular website.
This process is managed by your ISP — whether that is a cable provider, a DSL broadband provider, or a corporate network.
The DNS resolver for the ISP forwards the request for a particular website to a DNS root name server. And once the DNS server finds the IP address for the requested website, it will answer with the corresponding IP address.
Further, your local ISP will provide the host IP address to your browser.
Sometimes your ISP can’t find the IP address information locally. In this case, it forwards the query to other DNS servers in the world. The DNS servers will “talk” between them to fetch the IP address information of a domain.
Detailed explanation
The Domain Name System (DNS) resolution involves several entities working together: the client, the DNS resolver, and root name servers.
Here’s a step-by-step overview of the DNS communication process:
Client Initiates DNS Query. The process begins when a client, such as a web browser, initiates a DNS query. It requests the IP address corresponding to a domain name.
For example, the client wants to resolve the domain name “example.com” to an IP address. DNS works the same way, either for ipv6 or ipv4 addresses.
DNS Resolver Receives the Query. The DNS resolver, usually provided by the client’s ISP or network, receives the DNS query from the client. The resolver checks its local cache to see if it has the IP address for the requested domain name. There is a DNS hierarchy.
If the information has expired, or else if it’s not present in the cache, the DNS server resolves the query.
Recursive Query. The DNS resolver performs a recursive resolver query to find the IP address for the domain name.
It starts by querying the root DNS servers. Then sends a request for the tol level domain TLD servers that handle the requested domain extension (.com, .net, etc.).
Then…
TLD Name Server Resolution. The root DNS servers respond to the resolver with the IP address of the appropriate TLD name server.
The one responsible for the requested domain extension (e.g., the .com TLD server). The resolver then queries the TLD name server.
Authoritative Name Server Resolution. The TLD name server responds to the resolver with the IP address of the authoritative name server. The one responsible for the specific domain (e.g., the authoritative name server for “example.com”). The resolver then queries the authoritative name server.
Response and Caching. The authoritative name server responds to the resolver with the requested IP address. The resolver caches this response and sends it back to the client. The client can now use the obtained IP address to establish a connection with the desired resource (e.g., a web server).
Throughout the process, the devices use UCP or TCP packets to exchange DNS messages. It depends on the specific query and response sizes.
This distributed design allows DNS to resolve millions of domain names across the internet efficiently.
Subsequent queries for the same domain are served from the resolver’s cache, skipping the full resolution process until the cached record expires.
How to Check DNS Propagation
After updating your DNS records, you will want to confirm whether the changes have propagated in different regions of the world. There are two main ways to do this: using an online tool or using the command line.
Using an online tool
The easiest and most visual method is to use a web-based DNS propagation checker. Here are the most reliable options:
whatsmydns.net One of the most popular tools for checking DNS propagation. Enter your domain name, select the record type you want to check (A, MX, NS, etc.) and the tool will show you the current DNS response from dozens of servers around the world — with a green checkmark where propagation is complete and a red indicator where it is still pending.
DNSChecker.org Similar to whatsmydns, but with a more detailed geographic view. Useful for identifying specific regions where propagation is lagging behind.
MXToolbox Best for checking MX records and diagnosing email delivery issues during or after a DNS migration.
Using the command line
For a more technical check, you can query DNS records directly from your terminal:
On Linux or macOS:
dig copahost.com A
dig copahost.com NS
dig copahost.com MXCode language: CSS (css)
On Windows:
nslookup copahost.com
nslookup -type=MX copahost.com
nslookup -type=NS copahost.com
To check against a specific DNS server — for example, to see what Google’s DNS currently returns for your domain — use:
dig @8.8.8.8 copahost.com ACode language: CSS (css)This is useful for comparing what different DNS resolvers around the world are currently seeing for your domain.
Why is DNS Propagation Taking So Long?
In most cases, DNS propagation completes within a few hours. But sometimes it takes longer than expected. Here are the most common reasons:
High TTL value TTL (Time to Live) is the main factor controlling propagation speed. If your TTL was set to a high value — such as 86400 seconds (24 hours) — before you made the DNS change, every DNS resolver on the internet will keep serving the old record for up to 24 hours before checking for updates. There is no way to override this retroactively.
ISP caching behavior Some Internet Service Providers ignore TTL values and cache DNS records for longer than they should. This is particularly common in certain regions of the world and is largely outside your control.
DNS resolver cache not cleared Your own device or browser may still be serving a locally cached version of the old DNS record. Flushing your DNS cache (see commands in the previous section) can resolve this immediately for your own connection, without waiting for global propagation.
Incorrect DNS configuration If the new DNS records contain errors — such as a typo in an IP address or a missing trailing dot in a hostname — some resolvers may fail to resolve the record correctly, which can look like a propagation issue but is actually a configuration problem. Always double-check your records using a tool like MXToolbox before concluding that propagation is the issue.
Multiple layers of caching DNS queries pass through several layers — your browser, your operating system, your router, your ISP’s resolver, and upstream resolvers. Each layer has its own cache. Even after your ISP has updated its cache, your local device may still be serving the old result.
How to Reduce TTL Before a Migration
Reducing your TTL before a DNS migration is one of the most effective ways to speed up propagation when you need to move your website to a new server. Here is the recommended process:
Step 1: Lower your TTL well in advance
At least 48 hours before the planned migration, log in to your DNS management panel and reduce the TTL of the records you intend to change — typically the A record — to 300 seconds (5 minutes).
This gives existing caches time to expire and start using the shorter TTL. Once the 48-hour window has passed, most resolvers around the world will be refreshing your DNS record every 5 minutes instead of every 24 hours.
Step 2: Make the DNS change
When you are ready to migrate, update the DNS record (such as the A record) to point to the new server’s IP address. Because the TTL is now 300 seconds, most DNS resolvers will pick up the change within minutes rather than hours.
Step 3: Monitor propagation
Use whatsmydns.net or DNSChecker.org to monitor propagation progress in real time. Within 15 to 30 minutes, you should start seeing the new IP address being returned by most resolvers worldwide.
Step 4: Restore the TTL
Once propagation is confirmed and the new server is stable, restore the TTL to a standard value such as 3600 seconds (1 hour) or 86400 seconds (24 hours). Keeping a very low TTL permanently increases the load on your DNS servers unnecessarily.
| Stage | Action | TTL Value |
|---|---|---|
| 48h before migration | Lower TTL | 300 seconds (5 min) |
| At migration | Update DNS record | 300 seconds (5 min) |
| After confirmation | Restore TTL | 3600–86400 seconds |
DNS Propagation by Record Type
Not all DNS records propagate at the same speed. Each record type has different typical TTL values and different levels of caching across the internet. Here is what to expect for the most common record types:
A Record The most frequently updated record type, used when migrating a website to a new server. With a default TTL of 3600 seconds (1 hour), propagation typically completes within 1 to 4 hours when the TTL has been lowered in advance. Without preparation, it can take up to 24 hours.
AAAA Record Behaves identically to the A record in terms of propagation. The only difference is that it maps to an IPv6 address instead of IPv4.
MX Record Used for email routing. MX records tend to have higher default TTL values and are cached more aggressively by mail servers. Changes to MX records can take up to 24 to 48 hours to propagate fully — which means email delivery may be affected during a migration. Always plan MX record changes with extra lead time.
NS Record Name server records have the longest propagation time of all. Because NS records are cached at the root DNS level, changes can take the full 48 hours to propagate globally. This is why switching hosting providers — which requires updating NS records — always involves the longest wait.
CNAME Record Similar to A records in propagation speed. Changes typically take 1 to 4 hours when the TTL has been reduced beforehand.
TXT Record Commonly updated for SPF, DKIM and domain verification purposes. TXT records propagate relatively quickly — usually within 1 to 2 hours — but email authentication changes may take longer to be recognized by receiving mail servers.
| Record Type | Typical TTL | Propagation Time |
|---|---|---|
| A | 3600s (1h) | 1–4 hours |
| AAAA | 3600s (1h) | 1–4 hours |
| CNAME | 3600s (1h) | 1–4 hours |
| MX | 3600–86400s | 24–48 hours |
| NS | 86400s (24h) | 24–48 hours |
| TXT | 3600s (1h) | 1–2 hours |
What does DNS Cache mean?
DNS cache (also known as DNS resolver cache) refers to a process of storing data temporarily. For example, data about the previous DNS lookups on the computer’s operating system or browser.
The DNS cache maintains a record (IP address) of all recently viewed websites and domains. Maintaining a cached copy of DNS lookups speeds up the process of data retrieval. Speeds up IP address resolution as well, by avoiding the need to go through the complete process of DNS lookup again.
How to verify the health of my DNS?
Once your DNS has fully propagated, it is good practice to run a quick check to make sure all your records are resolving correctly. You can use tools like nslookup or dig to perform a DNS lookup and confirm that the expected IP addresses and records are being returned.
For a complete walkthrough of DNS record types, how to check each one, and how to use diagnostic tools in detail, see our full guide: What does DNS stand for? How it works, types and examples
Frequently Asked Questions about DNS Propagation
Why is my DNS not propagating?
The most common reasons are a high TTL value that was set before the change, aggressive caching by your ISP, or an error in the new DNS records. Check your records using a tool like MXToolbox to rule out configuration issues, and flush your local DNS cache to rule out a local caching problem. If the TTL was high before the change, you may simply need to wait for it to expire.
Does DNS propagation affect email?
Yes. If you change your MX records as part of a migration, email delivery can be affected during propagation. Some messages may still be routed to the old mail server while propagation is in progress. MX records have some of the longest propagation times — up to 48 hours — so plan email-related DNS changes with extra lead time and monitor delivery carefully during the transition.
Can I use my website during DNS propagation?
Yes, but the experience may be inconsistent. During propagation, some visitors will be directed to the old server while others are already reaching the new one, depending on which DNS resolver their ISP uses. To minimize disruption, keep both the old and new servers running and serving the same content until propagation is fully complete.
What is TTL in DNS propagation?
TTL (Time to Live) is a value set on each DNS record that tells resolvers how long they should cache that record before checking for updates. A TTL of 3600 means resolvers will cache the record for 1 hour. A lower TTL means changes propagate faster, while a higher TTL reduces DNS query load but slows down propagation. Lowering your TTL to 300 seconds before a planned migration is the most effective way to speed up the process.
How do I know when DNS propagation is complete?
Use a propagation checker like whatsmydns.net or DNSChecker.org. These tools query DNS servers in dozens of locations around the world and show whether each one is returning the new or old record. When all locations show the updated record, propagation is complete. You can also use the dig or nslookup commands in your terminal to check specific DNS servers manually.
Does DNS propagation happen automatically?
Yes. Once you save a DNS change, propagation starts automatically — you do not need to trigger it manually. DNS resolvers around the world will pick up the change on their own as their cached records expire based on the TTL value. The only action you can take to influence the speed is to lower the TTL before making the change, or flush your local DNS cache to update your own device immediately.
Conclusion
DNS propagation is a natural part of any domain change or server migration. While you cannot force it to happen instantly, understanding how it works — and preparing your TTL settings in advance — gives you full control over the process and significantly reduces downtime.
To recap the key points from this guide: propagation typically takes between 1 and 48 hours depending on the record type and TTL value; NS and MX records take the longest; and lowering your TTL to 300 seconds at least 48 hours before a migration is the single most effective step you can take to speed things up.
If you need to monitor propagation in real time, use whatsmydns.net or DNSChecker.org to track the status across different regions of the world.
For a deeper understanding of how DNS works as a whole — including record types, DNS security and how to change your DNS servers — see our complete guide: What does DNS stand for?
