
You edited a page, hit save, and… nothing changed on the front end. Before you panic, the culprit is almost always cache — a stored copy of your old page being served instead of the new one. Clearing it usually fixes the problem in seconds. But WordPress caching happens at several levels (plugin, server, browser, CDN), and sometimes you need to clear more than one. This guide walks through how to clear the WordPress cache at every layer, in the right order.
Start with your caching plugin (one click clears the site cache). If the change still doesn’t show, clear your browser cache (or open the page in incognito), then your host’s server cache, and finally your CDN if you use one. Work through the layers in that order.
Why you need to clear the cache
Every time someone visits your WordPress site, the server runs PHP and queries the database to build the page. Caching saves a ready-made copy of that page and serves it instead, so the site loads much faster. The trade-off: when you make a change, visitors (and you) may still see the old cached version until the cache is refreshed.
That’s why “my changes aren’t showing” is almost always a caching issue — not a lost edit. Clearing the cache forces WordPress to serve the fresh version. (If you’re still deciding which caching plugin to use, that’s a separate question — see our guide to the best WordPress cache plugins.)
The four layers of WordPress cache
Cache can live in four places, and outdated content can hide in any of them:
- Plugin cache — the page cache created by your caching plugin (LiteSpeed Cache, WP Rocket, etc.). Usually the first place to clear.
- Server cache — caching at the hosting level (like LiteSpeed server cache), independent of any plugin.
- Browser cache — a copy stored on your computer (and each visitor’s), separate from the site.
- CDN cache — if you use a CDN like Cloudflare, it caches your files on servers worldwide.
- Object cache — a different kind of cache that stores the results of database queries (via Redis or Memcached), rather than whole pages. Not every site uses it, but dynamic sites — especially WooCommerce stores and membership sites — often do, because it speeds up repeated database lookups.
The first four are page caches (they store the finished HTML). The object cache is different — it caches data, not pages. Most of the time your caching plugin or host manages it automatically, but if you’ve changed something that lives in the database (a setting, a product, a user role) and it’s not updating even after a page-cache purge, the object cache may need flushing. On LiteSpeed hosting, the LiteSpeed Cache plugin has a Purge All → Object Cache option; with Redis, hosts usually expose a flush button in the control panel.
To be sure a change is live, you may need to clear more than one. Here’s how to do each.
1. Clear the cache from your caching plugin
This is the fastest fix and the one to try first. Most caching plugins add a one-click purge to the WordPress admin bar or their settings page:
- LiteSpeed Cache: in the admin bar, click LiteSpeed Cache → Purge All. (Or the plugin dashboard → Toolbox → Purge All.)

- WP Rocket: in the admin bar, WP Rocket → Clear cache. Or Settings → WP Rocket → Clear Cache.
- W3 Total Cache: in the admin bar, open the Performance menu → Purge All Caches.
- WP Super Cache: Settings → WP Super Cache → Delete Cache.
- WP Fastest Cache: the plugin’s settings tab → Delete Cache.
After purging, reload your page. In most cases, the change appears immediately.
The LiteSpeed Cache plugin’s “Purge All” clears both the plugin cache and the LiteSpeed server cache in one step, because the plugin connects directly to the server cache. That covers two layers at once.
2. Clear your browser cache
Your own browser stores a local copy of the site. If a change shows for others but not for you, this is usually why. Two quick options:
- Hard refresh (fastest): press Ctrl + F5 (Windows/Linux) or Cmd + Shift + R (Mac). This forces the browser to re-download the page, bypassing its cache.
- Incognito/private window: open the page in a private window, which ignores your browser cache entirely — a great way to test whether a change is actually live.
To fully clear the browser cache in Chrome: menu (⋮) → Delete browsing data → check “Cached images and files” → clear. Firefox, Edge, and Safari have equivalent options. Leave “Passwords” unchecked so you don’t lose your logins.

This is the single most frequent cache complaint. When you edit your theme’s CSS or styling, the browser often keeps serving the old stylesheet from its cache. The fix is almost always a hard refresh (Ctrl+F5 / Cmd+Shift+R) — and if your caching plugin combines or minifies CSS, purge the plugin cache too, so it regenerates the combined file. Test in an incognito window to confirm the new styling is live for visitors.
On mobile, the browser cache matters too. In Chrome for Android: menu (⋮) → Settings → Privacy and security → Clear browsing data → “Cached images and files.” On the iPhone (Safari): Settings → Safari → Clear History and Website Data. As on desktop, a private/incognito tab is the quickest way to test a change without clearing anything.
3. Clear your host’s server cache
Many hosts run caching at the server level, independent of your plugins — so even after purging the plugin cache, the host might still serve an old copy. Where to clear it depends on your host:
- On cPanel with LiteSpeed (like Copahost), open the LiteSpeed Web Cache Manager and use Flush All — or simply use the LiteSpeed Cache plugin’s Purge All, which does it for you.
- Other hosts usually have a Caching option in their control panel or in the WordPress admin toolbar.
If you can’t find it, your host’s support can clear the server cache for you.
4. Clear your CDN cache
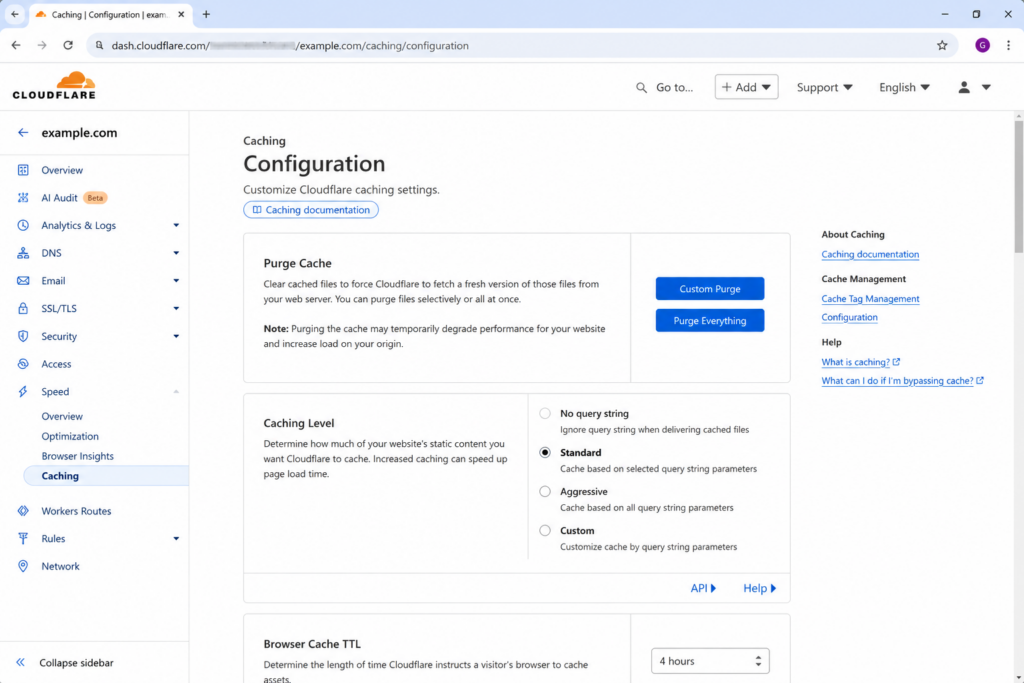
If your site runs through a CDN like Cloudflare, it caches your static files (images, CSS, JS) on servers around the world — the last layer that can serve outdated content. To clear Cloudflare’s cache: log in → select your domain → Caching → Configuration → Purge Everything (or Custom Purge for specific URLs). Other CDNs have a similar “purge” option in their dashboard.
How to confirm the cache was cleared
After purging, it helps to verify the fresh version is really being served — not just assume it. A few quick ways:
- Hard refresh and look for your change. The simplest check: hard refresh (Ctrl+F5 / Cmd+Shift+R) and confirm your edit now appears.
- Test in an incognito window. A private window has no cached copy, so if the change shows there, it’s live for new visitors.
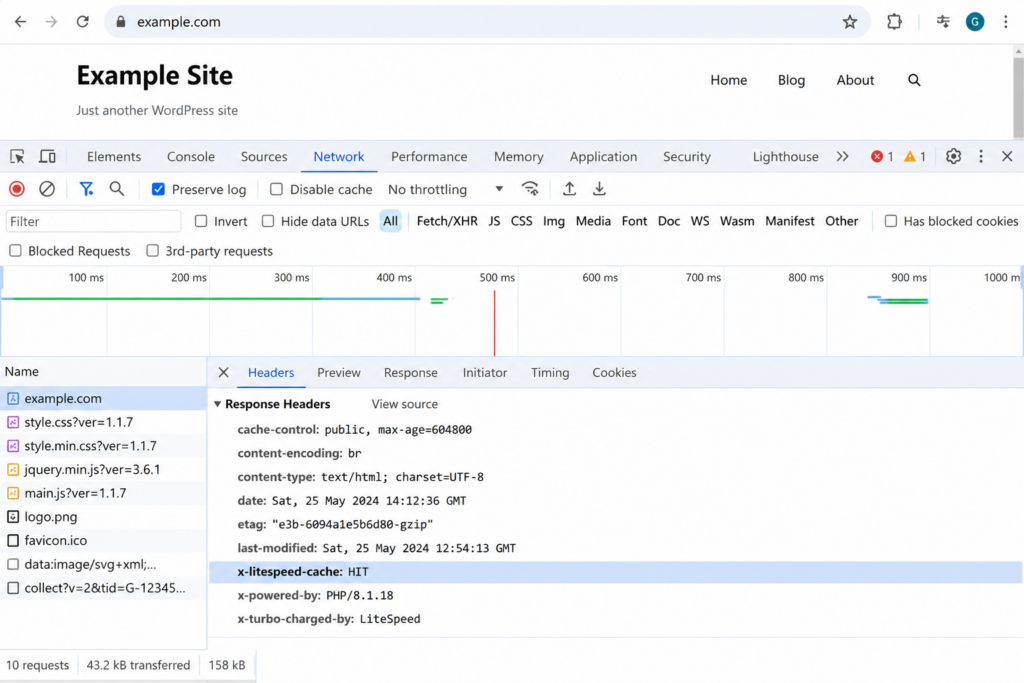
- Check the response headers. Open your browser’s Developer Tools (F12) → Network tab, reload the page, and click the document request. In the response headers, a caching layer often reports its status — for example, LiteSpeed shows an
x-litespeed-cacheheader (hitmeans it served a cached copy;missmeans it rebuilt fresh), and anageheader shows how long a cached copy has been stored. Anageof 0 right after a purge confirms the cache was cleared.
Still seeing old content? Try this
If you’ve cleared every layer and content is still stale, work through these:
- Hard refresh again (Ctrl+F5 / Cmd+Shift+R) after clearing all layers.
- Test in incognito to rule out the browser entirely.
- Check for two caching plugins. Running two at once causes conflicts — one plugin’s cache can immediately replace another’s cleared version. Use only one.
- Confirm the change actually saved (especially with page builders — publish, don’t just save a draft).
- Wait a minute. Some CDN and server caches take a short time to fully propagate the purge.
Copahost runs on LiteSpeed with server-level caching, so the free LiteSpeed Cache plugin gives you premium speed and one-click purging across plugin and server cache together — plus free SSL and NVMe storage.
See web hosting plansWhen (and how often) to clear the cache
You don’t need to clear the cache constantly — doing it too often defeats the purpose (each purge temporarily slows the site while the cache rebuilds). Clear it when:
- You made a change (content, theme, CSS) that isn’t showing.
- You installed or updated a plugin or theme.
- You’re troubleshooting a display or layout issue.
For normal operation, let the plugin manage cache expiration automatically. Most good caching plugins also auto-purge the relevant pages when you update a post, so manual clearing is mainly a troubleshooting step.
When clearing the cache doesn’t fix it
If your changes still won’t appear and you’ve truly cleared every layer, the problem may not be cache at all — it could be a broken .htaccess rule, a plugin conflict, or a deeper error. In that case, see our guide to common WordPress errors to diagnose what’s really going on. A stale cache can also mask a change you made in wp-config.php or your .htaccess file — clearing it lets you see whether that edit actually took effect.
Frequently asked questions
How do I clear my WordPress cache?
The fastest way is through your caching plugin — most add a “Purge All” or “Clear Cache” button to the WordPress admin bar. If the change still doesn’t show, clear your browser cache (hard refresh with Ctrl+F5 or Cmd+Shift+R), then your host’s server cache and your CDN if you use one.
Why aren’t my changes showing on WordPress?
Almost always because a cached (old) version of the page is being served. Clear your caching plugin’s cache first, then your browser cache. Your edit isn’t lost — it’s just hidden behind the cache.
Does clearing the cache delete anything important?
No. Clearing the cache only removes temporary stored copies of your pages; your content, settings, and data are untouched. The site may load slightly slower for a moment while the cache rebuilds.
How often should I clear the WordPress cache?
Only when needed — after making changes that aren’t showing, or when troubleshooting. Clearing it too often just slows the site down as the cache rebuilds each time. Let your plugin handle automatic expiration otherwise.
I cleared the cache but still see the old version. Why?
Outdated content can hide in another layer. Do a hard refresh, test in an incognito window, and make sure you’ve cleared the server and CDN caches too — not just the plugin. Also check you don’t have two caching plugins conflicting.
Conclusion
When a change doesn’t show up on your WordPress site, cache is almost always the reason — and clearing it is usually a matter of seconds. Start with your caching plugin’s one-click purge, then work outward through the layers: browser, server, and CDN. Remember that on LiteSpeed hosting the plugin handles both plugin and server cache together, and that a hard refresh or incognito window is the quickest way to test whether a change is truly live. Clear it when you need to, let your plugin handle the rest automatically, and your visitors will always see your latest version.
