A device which connects a computer to another computer or network is called a network device. Normal network devices (say for example eth0) will have a hardware component or a wire connected to it. On the oposite, there are virtual network devices which are completely controlled by software. They are the tun/tap devices.
These are entirely virtual, and the kernel manages all activities. Most commonly used where VPN (Virtual Private Network) setups are necessary. This article describes how you can enable tun/tap in an Ubuntu OpenVZ Cheap VPS Hosting Server. Also explains how to install and configure OpenVPN in Ubuntu server, how to install and setup OpenVPN client and how to connect to server from client. Step by step instructions will be provided here with expected output and images, which would help you proceed with the setup without difficulty.
Enabling tun/tap support in a physical Ubuntu server
You need to enable Tun/tap at the kernel level. Most latest operating systems have support for tun/tap enabled by default. You just need to insert the required kernel module for it to work. First, login to your main node as root and insert the module as follows.
root@node ~# modprobe tun
How to enable tun/tap in a VPS Server
If you are on a KVM VPS, then you can enable tun/tap as mentioned above because KVM does not use a shared kernel. Just like a cheap dedicated server, the KVM VPS uses a dedicated and isolated kernel. If you are on OpenVZ VPS, then the support needs to be enabled in the node first. OpenVZ uses a shared kernel for all VPS, hence if a VPS owner wants tun/tap, it has to be set by us in the main node. After that you can enable it from your VPS Control Panel as follows.
- Login to your VPS control panel using your username and password.
- Click the ‘Manage’ button to the right of the VPS in which you want to enable tun/tap
- Under Controls -> Settings tab, click on ‘Enable TUN/TAP’
- A dialog box appears asking for confirmation, hit yes
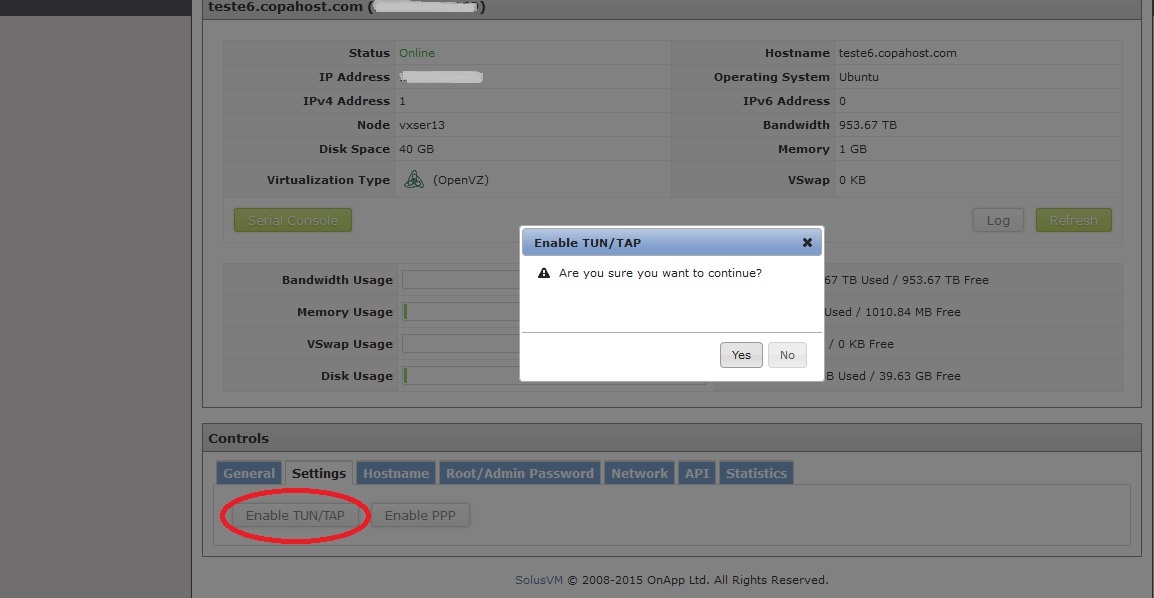
- Now TUN/TAP will be enabled in your VPS and a confirmation message will be displayed in your control panel screen.

TUN/TAP is now enabled and you can verify that it is working correctly as follows. Login to your VPS and execute the following command.
root@teste6:~# cat /dev/net/tun
cat: /dev/net/tun: File descriptor in bad state
If the output shows “File descriptor in bad state”, then it means it is working correctly.
Install OpenVPN in Ubuntu server
Now that tun/tap is enabled, we can proceed to install openvpn. I have chosen an Ubuntu server for setting up OpenVPN. Login to the server as root and first update the packages in the server and then execute the installation command for openvpn.
root@teste6:~# apt-get update

root@teste6:~# apt-get install openvpn
The next step in the process is setting up certificates. OpenVPN works on a Public Key Infrastructure which includes a public key and a private key for the server. It’s also based on a vpn client, and also a master CA certificate which is used to sign the server and client certificates. OpenVPN works by the server and client authenticating each other, throught comparing whether the certificates are signed by the master CA.
Generate Server and Client Certificates
The openvpn installation automatically downloads sample configuration files at /usr/share/doc/openvpn/examples/. To setup the certificates for OpenVPN in Ubuntu server, first create a folder easy-rsa under /etc/openvpn . Then, copy the contents from /usr/share/doc/openvpn/examples/easy-rsa/2.0 folder to /etc/openvpn/easy-rsa.
root@teste6:~# mkdir /etc/openvpn/easy-rsa

root@teste6:~# cd /usr/share/doc/openvpn/examples/easy-rsa/2.0/

root@teste6:/usr/share/doc/openvpn/examples/easy-rsa/2.0# cp -pr * /etc/openvpn/easy-rsa
Next step is to open the vars file and edit the following contents to suit yours.
root@teste6:~# vi /etc/openvpn/easy-rsa/vars

export KEY_COUNTRY="US"
export KEY_PROVINCE="CA"
export KEY_CITY="SanFrancisco"
export KEY_ORG="Fort-Funston"
export KEY_EMAIL="[email protected]"
Now we are going to generate the master CA certificate and key based on the details above. For that, perform the following steps. For the questions asked, enter your details and not the default presented.
root@teste6:~# cd /etc/openvpn/easy-rsa/


root@teste6:/etc/openvpn/easy-rsa# source vars
NOTE: If you run ./clean-all, I will be doing a rm -rf on /etc/openvpn/easy-rsa/keys


root@teste6:/etc/openvpn/easy-rsa# ./clean-all


root@teste6:/etc/openvpn/easy-rsa# ./build-ca
Generating a 1024 bit RSA private key
....................................++++++
....................++++++
writing new private key to 'ca.key'
-----
You are about to be asked to enter information that will be incorporated
into your certificate request.
What you are about to enter is what is called a Distinguished Name or a DN.
There are quite a few fields but you can leave some blank
For some fields there will be a default value,
If you enter '.', the field will be left blank.
-----
Country Name (2 letter code) [US]:US
State or Province Name (full name) [CA]:CA
Locality Name (eg, city) [SanFrancisco]:SanFrancisco
Organization Name (eg, company) [Fort-Funston]:CopaOpenVPN
Organizational Unit Name (eg, section) [changeme]:COPAVPN
Common Name (eg, your name or your server's hostname) [changeme]:ovpn.copahost.com
Name [changeme]:COpa
Email Address [[email protected]]:[email protected]
The master certificate files
You can now see that the master certificate and key files are in /etc/openvpn/easy-rsa/keys , namely ca.crt and ca.key. Next step is to generate the server certificate (public key) and private key for the server. It will again ask for the details asked above, go for the defaults based on the vars file or you can enter them again. Enter your server’s hostname for Common Name. It will ask for a challenge password and confirmation to sign the certificate, enter the password and enter ‘y’ to confirm.
root@teste6:/etc/openvpn/easy-rsa# ./build-key-server ovpn.copahost.com
Generating a 1024 bit RSA private key
.......................++++++
...........++++++
writing new private key to 'ovpn.copahost.com.key'
-----
You are about to be asked to enter information that will be incorporated
into your certificate request.
What you are about to enter is what is called a Distinguished Name or a DN.
There are quite a few fields but you can leave some blank
For some fields there will be a default value,
If you enter '.', the field will be left blank.
-----
Country Name (2 letter code) [US]:US
State or Province Name (full name) [CA]:CA
Locality Name (eg, city) [SanFrancisco]:SanFrancisco
Organization Name (eg, company) [Fort-Funston]:CopaOpenVPN
Organizational Unit Name (eg, section) [changeme]:COPAVPN
Common Name (eg, your name or your server's hostname) [ovpn.copahost.com]:ovpn.copahost.com
Name [changeme]:COpa
Email Address [[email protected]]:[email protected]

Please enter the following 'extra' attributes
to be sent with your certificate request
A challenge password []:copa123#
An optional company name []:
Using configuration from /etc/openvpn/easy-rsa/openssl-1.0.0.cnf
Check that the request matches the signature
Signature ok
The Subject's Distinguished Name is as follows
countryName           :PRINTABLE:'US'
stateOrProvinceName   :PRINTABLE:'CA'
localityName          :PRINTABLE:'SanFrancisco'
organizationName      :PRINTABLE:'CopaOpenVPN'
organizationalUnitName:PRINTABLE:'COPAVPN'
commonName            :PRINTABLE:'ovpn.copahost.com'
name                  :PRINTABLE:'COpa'
emailAddress          :IA5STRING:'[email protected]'
Certificate is to be certified until May  9 04:58:26 2026 GMT (3650 days)
Sign the certificate? [y/n]:y


1 out of 1 certificate requests certified, commit? [y/n]y
Write out database with 1 new entries
Data Base Updated
Though certificates are used in openvpn for encryption it also requires the generation of Diffie Helman parameters for better encryption. It can be generated as follows.
root@teste6:/etc/openvpn/easy-rsa# ./build-dh
Generating DH parameters, 1024 bit long safe prime, generator 2
This is going to take a long time
............................................................................................+.........
++*++*
Now all the required certificates and keys will be present in /etc/openvpn/easy-rsa/keys. We will copy them to /etc/openvpn now.
root@teste6:/etc/openvpn/easy-rsa/keys# cp ca.crt  dh1024.pem ovpn.copahost.com.crt
ovpn.copahost.com.key /etc/openvpn/
Create client certificates
Now that the server certificate and key sections are over, we will move to creating client certificates. Each client connecting to the openvpn server will require a different certificate to authenticate to the server. The client certificates are created as follows.
root@teste6:~# cd /etc/openvpn/easy-rsa/
root@teste6:/etc/openvpn/easy-rsa# source vars
NOTE: If you run ./clean-all, I will be doing a rm -rf on /etc/openvpn/easy-rsa/keys
root@teste6:/etc/openvpn/easy-rsa# ./build-key clientname
The build-key command will again ask details as asked above while creating the certificate. This time enter the client details. You can give any name for client certificate instead of ‘clientname’.
To connect to the openvpn server from an openvpn client, you will require the following three files. Copy them to your client machine using any secure means.
- The master CA certificate present at /etc/openvpn/ca.crt
- The client certificate present at /etc/openvpn/easy-rsa/keys/clientname.crt
- The client key present at /etc/openvpn/easy-rsa/keys/clientname.key
Now the certificate part is over, we next need to move to the server configuration part.
OpenVPN Server Configuration
As in the case with certificates, the openvpn installation provides sample config files also at /usr/share/doc/openvpn/examples/sample-config-files. Two files named client.conf and server.conf.gz are the ones we require now. First, copy the compressed server.conf.gz to /etc/openvpn and uncompress it.
root@teste6:/usr/share/doc/openvpn/examples/sample-config-files# cp server.conf.gz /etc/openvpn/
root@teste6:/usr/share/doc/openvpn/examples/sample-config-files# cd /etc/openvpn/

root@teste6:/etc/openvpn# gunzip -d server.conf.gz
After uncompressing, you will get a file named server.conf at /etc/openvpn. Open that file and edit the following section in it to match the certificates present in your server.
root@teste6:/etc/openvpn# vi server.conf

ca ca.crt
cert ovpn.copahost.com.crt
key ovpn.copahost.com.key

dh dh1024.pem
Save and quit the file. This is the last step in the configuration of openvpn server in Ubuntu. You can now restart the openvpn service in the server and see if it gets started successfully.
root@teste6:/etc/openvpn# /etc/init.d/openvpn start
 * Starting virtual private network daemon(s)...
*   Autostarting VPN 'server'
OpenVPN has started successfully now, without errors. You can confirm that it is running fine by executing the following. The logs and errors related to OpenVPN will be present in syslog at /var/log/syslog .
root@teste6:/etc/openvpn# ps aux | grep openvpn
root      5736  0.0  0.1  21972  1268 ?        Ss   09:42   0:00 /usr/sbin/openvpn --writepid /var/run/openvpn.server.pid --daemon ovpn-server --cd /etc/openvpn --config /etc/openvpn/server.conf --script-security 2
OpenVPN uses the virtual network device tun to connect. So when openvpn is started, you will see a tun interface when you execute the ifconfig command in the server as follows.
root@teste6:~# ifconfig tun0
tun0      Link encap:UNSPEC  HWaddr 00-00-00-00-00-00-00-00-00-00-00-00-00-00-00-00
          inet addr:10.8.0.1  P-t-P:10.8.0.2  Mask:255.255.255.255
          UP POINTOPOINT RUNNING NOARP MULTICAST  MTU:1500  Metric:1
          RX packets:0 errors:0 dropped:0 overruns:0 frame:0
          TX packets:0 errors:0 dropped:0 overruns:0 carrier:0
          collisions:0 txqueuelen:100
          RX bytes:0 (0.0 B)  TX bytes:0 (0.0 B)
OpenVPN Client Configuration
After having your OpenVPN Server ready, you can now ready this article about how to configure an OpenVPN Client in Windows
