How to Connect an OpenVPN Client in Windows
We read about how an OpenVPN Server can be setup and made ready to connect from an OpenVPN client in the article Configuring OpenVPN in Ubuntu using TUN/TAP
Let’s see how to set it up in a windows machine at home and how it can be used to connect to the OpenVPN server. I currently use a windows 8.1 machine. I will download the OpenVPN client from their official website. Since I use Windows 8.1, I will choose the exe file for windows installers ‘Installer (64-bit), Windows Vista and later’. Once downloaded, double click the exe and install the software. Unless you need to change it, the default OpenVPN installation path would be C:\Program Files\OpenVPN\
Please note that openvpn does not run on windows xp anymore. The operating systems for windows servers are for the windows 7 onwards only.
In order to setup the client, and start connecting to the server we first need to copy the following four files from the OpenVPN server.
- The sample client configuration file at /usr/share/doc/openvpn/examples/sample-config-files/client.conf
- The master CA certificate – ca.crt
- The client certificate generated in the server for my machine which I had named as clientname.crt
- The client key named clientname.key
If you have root access to the OpenVPN server, just issue the following commands and copy the contents from the shell directly.
root@teste6:~# cat /usr/share/doc/openvpn/examples/sample-config-files/client.conf

root@teste6:~# cat /etc/openvpn/ca.crt

root@teste6:~# cat /etc/openvpn/easy-rsa/keys/clientname.crt

root@teste6:~# cat /etc/openvpn/easy-rsa/keys/clientname.key
In my windows client, now I will go to Start -> Search for notepad, right click and select ‘Run as administrator’. Then copy the contents of client.conf and save the file as C:\Program Files\OpenVPN\config\client.ovpn. You can choose whatever name you like for the file, but it is mandatory that it should end with the extension .ovpn so that OpenVPN can identify it as a config file. Create three new files, each for ca.crt, clientname.crt and clientname.key and save them also in C:\Program Files\OpenVPN\config folder. Make sure that the extension of the files read as .crt and .key and not .crt.txt or .key.txt
Open the client.ovpn file and make sure to place in the correct location the following files mentioned in the conf. In my case I placed them all in the same config folder as client.ovpn, hence I have not mentioned the full path to the files.
This will import file when you run the Openvpn.
ca ca.crt
cert clientname.crt
key clientname.key
In addition, you need to specify the OpenVPN server address below. You can either provide the hostname or the IP Address. 1194 is the default OpenVPN port.
remote ovpn.copahost.com 1194
Connecting to Server from your OpenVPN Client
The entire process has now finished and it is time to connect to the OpenVPN server from the client. Double click on the OpenVPN GUI shortcut which will be present in your Desktop after installation. You will notice a small computer icon with a lock in the system tray icon. Right click on it, and click ‘Connect’.
This way, OpenVPN access server, and you’re almost ready to go.

If more than one configs are present, it will list all the configs added in the OpenVPN Client config folder. Choose the one you want to connect and click ‘Connect’. If everything goes well, you will soon get a message that OpenVPN is connected. It will automatically assign a free internal IP to your machine as shown in the message below.

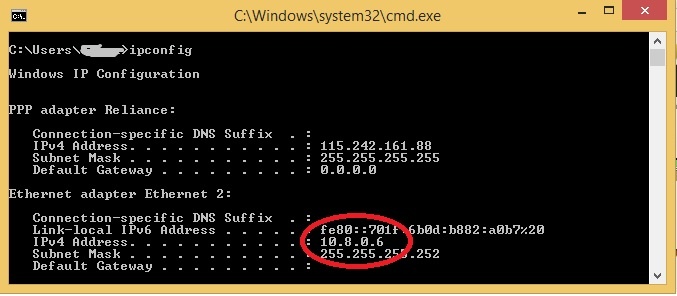
If you check your client machine’s shell, and issue an ‘ipconfig’ command you will see the new internal IP address listed there.
In addition, you would be able to ping the internal IP Addresses to and from the client. If it doesn’t respond, check your firewall settings.
Please nothe that official OpenVPN is an open source OpenVPN.
The post was intended to give you a basic introduction on how to connect to an OpenVPN server from a windows client. Hope the post has been of help for you, and has served its purpose.